Archives for July 2017

Ask the Doctor – Does Insurance Cover Breast Reconstruction for Poland’s Syndrome?

This week, Gail Lanter, CPC of The Center for Natural Breast Reconstruction answers your question.

Question: I was wondering what insurance would cover breast reconstructive surgery that’s due to having Poland Sydrome? My case I where I was born with out having my right breast muscle and a smaller areola.

Answer:  I would be happy to check into your specific insurance company medical policy if you want to share that information. I’ll just need basic demographic information (I’ve attached a form you can use to provide what I’ll need) and a copy of the front and back of your insurance card. I’m not sure from the phrasing of your question if you currently have coverage or if you are researching to find out which insurance would offer coverage, could you clarify? I can help either case.


The good news is that we’ve been able to get breast reconstruction for Poland’s syndrome covered for past patients and certainly know how to navigate the process to make that happen for you. Feel free to give me a call or send info via e-mail. I’m always happy to help – and I do love a challenge !!) Have a great day and I look forward to your reply.


Have a question about breast reconstruction or post-surgical you’d like answered from our surgical team? Just ask!

3 Grilled Dinner Recipes the Entire Family Will Enjoy

Tired of eating the same foods every week? We don’t blame you. While your kids may not mind eating cartoon-shaped, cheese-covered noodles for dinner every night, we know that your more sophisticated palate may be craving a few new recipe options.

For that reason, we decided to pull together 3 of our favorite dinner recipes.

But here’s the best part…we’re not only giving you some new recipes to try out. We’re sharing recipes that are easy to make, healthy, and—unless you have incredibly picky kids—please all of your family members’ palates.

Get the recipes now…

BBQ Chicken Recipe

BBQ chicken is a classic summertime dinner staple. This recipe is savory, delicious, and best of all, takes less than an hour to make! Give it a try…

Ingredients:

  • 1 (3 1/2-pound) chicken, cut into 8 pieces
  • Salt and freshly ground black pepper
  • 3/4 cup ketchup
  • 1/4 cup plus 2 tablespoons packed dark brown sugar
  • 3 tablespoons white wine vinegar
  • 2 tablespoons minced onion
  • 2 tablespoons Dijon mustard
  • 1/4 to 1 teaspoon hot sauce, (recommended: Tabasco)
  • 1/4 teaspoon freshly ground black pepper
  • 3 tablespoons chopped scallions (white and light green parts)
  • 1 1/2 teaspoons freshly grated lime zest
  • 1 1/2 teaspoons freshly squeezed lime juice
  • Lime wedges, for serving

Directions:

1. Mix up the BBQ sauce.

Easy BBQ Sauce:

In a small bowl, whisk together the ketchup, brown sugar, vinegar, onion, mustard, hot sauce, and black pepper. Stir in the scallions, lime zest, and lime juice. Can be covered and refrigerated for up to 1 week.

2. Prepare a medium-hot grill or preheat the broiler. If using the broiler, line a rimmed baking sheet with aluminum foil.

3. Season the chicken with salt and pepper, to taste. Put the chicken on the grill or, if broiling, put it on the prepared baking sheet. Grill or broil, 4 inches from the heat, turning once, for 10 minutes per side.

4. Put 1/2 of the BBQ sauce in a small bowl, for drizzling and serving. Reserve.

5. Baste the chicken with the remaining sauce and grill or broil for 5 minutes more. Transfer the chicken to a serving platter, drizzle with some of the reserved sauce, and serve with lime wedges and the remaining reserved sauce.

Recipe Source: http://www.foodnetwork.com/recipes/paula-deen/easy-after-work-bbq-chicken-recipe-1921598

Orange Garlic Tuna Steaks Recipe

Fish is a very healthy food that is full of important omega-3s. Even if you don’t care for fish, we encourage you to give this recipe a try. The delicious orange garlic marinade masks any unpleasant fishy tastes. Try it out…

Ingredients:

  • 1/4 cup orange juice
  • 1/4 cup soy sauce
  • 2 tablespoons olive oil
  • 1 tablespoon lemon juice
  • 2 tablespoons chopped fresh parsley
  • 1 clove garlic, minced
  • 1/2 teaspoon chopped fresh oregano
  • 1/2 teaspoon ground black pepper
  • 4 (4 ounce) tuna steaks

Directions:

1. In a large non-reactive dish, mix together the orange juice, soy sauce, olive oil, lemon juice, parsley, garlic, oregano, and pepper. Place the tuna steaks in the marinade and turn to coat. Cover, and refrigerate for at least 30 minutes.

2. Preheat grill for high heat.

3. Lightly oil grill grate. Cook the tuna steaks for 5 to 6 minutes, then turn and baste with the marinade. Cook for an additional 5 minutes, or to desired doneness. Discard any remaining marinade.

Recipe Source: http://allrecipes.com/recipe/39455/marinated-tuna-steak/

Grilled Portobello Burger Recipe

For those of you who are vegetarians—or simply love your vegetables—you definitely want to add this recipe to your menu! This hearty, savory Portobello burger, topped with homemade onion jam is bound to get your mouth watering. Give it a try…

Ingredients:

  • 2/3 cup low-fat plain yogurt
  • 3 tablespoons prepared horseradish
  • 4 tablespoons extra-virgin olive oil
  • 3 medium-large red onions, thinly sliced (about 2 pounds)
  • 2 sprigs fresh thyme
  • Kosher salt and freshly ground black pepper
  • 1 cup red wine
  • 1/4 cup honey
  • 1/4 cup red wine vinegar
  • 1 garlic clove, crushed
  • 2 tablespoons balsamic vinegar
  • 4 large Portobello mushrooms, (about 1 pound) stemmed
  • Lettuce leaves
  • 4 whole grain buns, or whole wheat English muffins, split and toasted

Directions:

1. Put the yogurt in a paper towel-lined strainer set over a bowl, set aside to drain and thicken, about 60 minutes. Discard the watery liquid. Whisk the horseradish into the thickened yogurt.

2. Meanwhile, heat 2 tablespoons of the olive oil in a medium skillet, over medium heat. Add the onions, 1 thyme sprig, and season with salt and pepper, to taste. Cook, covered, until the onions have wilted, about 10 to 15 minutes (give them a stir every now and then with a wooden spoon to prevent them from sticking). Add the red wine, and simmer over high heat until most of the wine gets absorbed into the onions. Add the honey and red wine vinegar and simmer gently until the onions get jam-like, about, about 15 minutes.

3. Preheat a stove top grill pan over medium-high heat. Whisk the remaining 2 tablespoons oil, garlic, and balsamic vinegar in a bowl. Strip and add the leaves from the remaining sprig of thyme.

4. Coat the mushroom caps all over with the flavored olive oil. Grill the mushrooms, turning as needed, until tender but not mushy about 3 to 4 minutes per side. Season with the salt and pepper.

5. Sandwich the mushroom between the buns, top with some of the onion jam, some lettuce, and a dollop of the horseradish cream. Serve warm.

Do you have a favorite grilling recipe? Share it with us in the comments below!

Ask the Doctor – I’m still in pain and swollen after my implant reconstruction 4 months ago. Can you help?

This week, Richard M. Kline, Jr., MD of The Center for Natural Breast Reconstruction answers your question.

Question: Hello, I hope you can help me with my dilemma, I did my full mastectomy and put the breast implant on Feb 2 2017, since then my body did not heal, still in pain, hardness and tightness in my breast but the other problem my stomach got big it looks like I’m 5mnth pregnant, the surgeon and specialist told me it’s because of the pain medicine but I know my body it’s just not the medicine something else, this problem is preventing me from doing the things I do in life, don’t want to go out anymore because of what I look like, please help me.

Answer:  I’m sorry you are having such a rough time. Sadly, it is not unusual for women to feel like the implants “don’t belong”, and describe unpleasant symptoms such as yours, although many women seem to tolerate them well. I’m not sure what to make of your stomach issues – pain medicine can certainly constipate you, but whether that explains your problem, I can’t know.

I would suggest that you first address these issues with your local plastic surgeon, as he/she is in the best position to help you. If that doesn’t work, I would be more than happy to see you in our office in Charleston, where hopefully I could make some more definitive recommendations.

Have a question about breast reconstruction or post-surgical you’d like answered from our surgical team? Just ask!

5 Tips for Taking the Stress out of Summer Vacations

Summerkids are off school, adults have vacation time, the weather is beautiful, and it’s the perfect time to take a much-deserved vacation. Yet, unfortunately, many people’s fantasy of a relaxing vacation (sitting on a white sand beach with a drink in hand) doesn’t always work out as planned.

That’s right.

Screaming kids, forgetting to pack your swimsuit, or not being able to find an affordable plane ticket are all things that can easily ruin a vacation. Yikes!

At The Center for Natural Breast Reconstruction, we know how important it is for you (and your family) to rest, relax, and recharge. Which is why we’ve put together 5 tips that we hope will help you take the stress out of your vacation this year.

Check them out now…

Create a Packing List

Every travel destination comes with different packing needs. This is why it’s so important to take time to create a packing list to ensure you pack the appropriate attire.

Trust us, you wouldn’t want to make it all the way to Alaska and realize that you forgot your winter coat—Yes! Even in the summer months!

And just as every travel destination has different packing needs, so does every member of your family if you’re traveling with your significant other and/or children.

Heaven forbid you forget to bring your 3-year-old’s teddy bear for nighttime, and he doesn’t sleep the entire vacation. That’s stressful and no fun for anyone!

Ensure you don’t forget the essentials, and create a packing list. Review the list with whomever you are traveling with, and then check off each item on the list as you put it into your suitcase.

Invite an Extra Set of Hands to Help You on Your Trip

Inviting a friend or family member to go on your vacation to help if you have small children is a wonderful idea for many reasons.

Reason 1: If you have multiple small children, you already know how challenging traveling can be. When you have a second set of hands, you’ll have someone to sit in the backseat with child #1 when he needs help starting a movie on his iPad so you can drive in peace.

Reason 2: Safety. Parking lots, large crowds, pools/beaches, etc., are all dangerous for children. And if you have more than one child, it can be hard to keep an eye on everything to ensure everyone is safe and sound. Having a second set of eyes is a good way to keep everyone safe and happy so you can enjoy your vacation.

Reason 3: It’s nice to have the company of another adult. If you’re a single parent or are just traveling alone with your children, you know how mind-numbing constant conversations about your child’s favorite cartoon show can be. Bringing someone along with you makes it easier to have enjoyable adult conversations, whether you’re driving in the car, on a plane, or sitting at the beach.

Plan Ahead

Some people say spontaneity is the spice of life. Yet, those who went to NYC to see Hamilton without purchasing tickets in advance and missed the show would probably disagree.

If you know for sure that you want to do a specific activity, see a certain show, or go out to a special dinner, be sure to book everything in advance.

This not only takes the stress out of having to book everything last minute while you’re trying to enjoy your vacation, but it also helps ensure that you get to do the things you want to do while on vacation.

Booking ahead is also a great idea for hotels and airlines. When you plan in advance, you can watch rates and will most likely get a better deal on the cost of lodging or transportation instead of waiting to the last minute.

Provide Adequate Sleep/Rest Time

On vacation, people tend to get thrown off their normal schedules. And while adults can get moody if they don’t get enough sleep, lack of rest can be extremely detrimental for kids. We all know how stressful crying, screaming kids can be!

The good news is that there’s a simple solution to this problem. All you’ve got to do is schedule rest breaks into your day to avoid crankiness or meltdowns.

A simple hour nap or quiet break in the middle of the day can do wonders for children. You may also find, that as an adult, you also this break to relax amidst the hustle and bustle of your vacation as well.

Go into Your Vacation with the Right Mindset

It’s so easy to fantasize about the perfect vacation. After all, you’ve work so hard all year, and you clearly deserve the best vacation ever.

While it’s ok to expect the best out of your next vacation, it’s also important to have the right mindset. Not every vacation will be perfect. It may rain on your beach day. Tickets might be sold out to the dinner show you want to see. You may get a tummy ache from eating too much ice cream and have to cancel your fancy dinner reservations.

Stuff happens…and some people let the minor hiccups in a vacation ruin their entire trip. Don’t let this happen to you.

Go into your vacation with the mindset that you’re going to make the best of whatever happens on your trip. If it rains on your beach day, maybe it’s a good day to learn something new at a museum. And if you get a stomach ache from eating too much ice cream, that stinks—but at least you got to eat dessert for lunch that day! Score!

The key is flexibility. If one plan doesn’t work, have a plan B and try something different. Who knows, you might end up trying a new activity or seeing a new sight that becomes the highlight of your trip!

Go into your vacation with a mindset that you’re going to enjoy yourself no matter what happens. Travel delays, bad weather, cranky kids, etc., can wreak havoc on your trip, unless you are willing to roll with the punches and resort to a plan B if necessary. Flexibility is key.

Do you have any tips for taking the stress out of summer vacations? Share them with us in the comments below!


Ask the Doctor-Do You Remove Breast Implants?

This week, James E. Craigie, MD of The Center for Natural Breast Reconstruction answers your question.

Question: Do you do breast implant removal?

Answer:  Thank you for your question regarding implant removal. Yes we do frequently remove breast implants. There are many different situations when it might be necessary. In general there are two categories of scenarios. Cosmetic reasons (implants originally placed to enhance the normal breast) and reconstruction ( rebuilding the breast after it has been removed for cancer treatment and or prevention) reasons. If you would like to let me know more about the specific details of your question I could give you more specific information. Thanks again.

Have a question about breast reconstruction or post-surgical you’d like answered from our surgical team? Just ask!

National Ice Cream Day Celebration Recipes

One of our very favorite holidays is just around the corner…National Ice Cream Day! We can’t wait to celebrate with a scoop (or two, or three!) of our favorite ice cream flavors.

National Ice Cream Day falls on July 16 this year. If you had no idea that this delicious holiday was happening in a less than a week, not to worry!

To help ice cream lovers across the country prepare for the celebration, we’ve decided to put together a handful of our favorite ice cream recipes. Check them out, stock up on all the ingredients you need to make the recipes, and you’ll be prepared to celebrate this decadent holiday!

Salted Caramel Pretzel Milkshake Recipe

This sweet and salty recipe will make you wish National Ice Cream Day was every day! Give this recipe a try…

Ingredients:

Sea Salt Caramel Sauce

  • 3/4 cup light brown sugar
  • 1/2 cup Karo® Light Corn Syrup
  • 2 tablespoons butter
  • 1/2 cup whipping cream OR canned coconut milk
  • 1/2 teaspoon fine sea salt
  • 1 teaspoon pure vanilla extract

Salted Caramel Pretzel Milkshake

  • 2 cups vanilla ice cream
  • 1/4 cup thoroughly chilled Sea Salt Caramel Sauce
  • 1/4 cup milk
  • 1/3 cup salted caramel pretzel pieces
  • whipped cream, optional

Directions:

Caramel Sauce

  1. Combine brown sugar, corn syrup and butter in a 1-quart saucepan. Stirring frequently, bring to a full boil over medium heat and boil 1 minute.
  1. Remove from heat; immediately stir in cream, sea salt and vanilla.
  1. Refrigerate to store. Microwave 30 seconds and stir before serving.

Salted Caramel Pretzel Milkshake

  1. Combine ice cream, sea salt caramel sauce, milk, and salted caramel pretzel pieces in a blender.
  1. Blend until smooth.
  1. Pour into 2 glasses and, if desired, garnish with whipped cream, more caramel sauce and pretzel pieces.

Recipe Source: http://www.mybakingaddiction.com/salted-caramel-pretzel-milkshake/

Peanut Butter Ice Box Ice Cream Cake

It wouldn’t be a celebration without a cake—made of ice cream! Try your hand at making an ice cream cake with this recipe…

Ingredients:

Chocolate Cake

  • 1 cup oil
  • 2 cups sugar
  • 3 eggs
  • 1 teaspoon vanilla extract
  • 1 cup of milk
  • 1 cup coffee, brewed strongly
  • 1 cup Dutch cocoa powder
  • 2 cups all-purpose flour
  • 1 teaspoon baking powder
  • 2 teaspoons baking soda
  • Pinch salt

Ice Cream Cake

  • 1 pint chocolate ice cream
  • 2 cups creamy peanut butter
  • 1 pint vanilla ice cream
  • Chocolate cake

Directions:

1. Make the chocolate cake: Preheat oven to 350 degrees F. Choose between a 10 by 3-inch round or a rectangular shaped baking pan and spray it with baking grease or butter and then line the bottom with parchment paper.

2. Combine the oil and the sugar in mixer until well blended. Add the eggs and the vanilla extract and continue to mix until well blended. Add the milk and the coffee.

3. Sift all of the dry ingredients and then add them to the wet ingredients in three batches allowing each batch to be thoroughly absorbed.

4. Pour the batter in prepared pans and bake for approximately 25 minutes or until a skewer is clean when removed. Allow to cool before unmolding. Once chocolate cake has cooled, unmold, and refrigerate overnight to allow it to cool thoroughly.

5. Make the ice cream cake: Cut the chocolate cake horizontally to make 2 layers out of the 1 layer and slide 1 of the layers onto a plate or cake board attempting not to break the layers.

6. Line the same pan used to bake the chocolate cake in plastic wrap (the plastic will help you remove the ice cream cake from the pan once it is set, so make sure to use a large enough piece and slide 1 of the half layers of chocolate cake into the pan). Make sure that it rests firmly in the bottom of the pan and, if the plastic wrap has slipped in, adjust so that it spills over the sides of the pan.

7. Empty a pint of chocolate ice cream, or your favorite brand, into a mixer and soften until it is easily spread; do not let it become runny. Pour the ice cream into mold over chocolate layer and spread evenly with a spatula or the back of a spoon. Return to freezer until set, approximately 2 hours.

8. Soften 2 cups of creamy peanut butter in the microwave without letting it get runny, approximately 2 minutes. Then pour the peanut butter over the chocolate ice cream. Using a spatula or the back of a spoon, spread the peanut butter evenly over the chocolate ice cream. Place the second half of the chocolate cake layer over the peanut butter and pat down firmly. Return to freezer until set, approximately 2 hours.

9. Empty a pint of vanilla ice cream or your favorite brand, into a mixer and soften it until it can be easily spread. Pour into mold over chocolate layer and spread evenly with a spatula or the back of a spoon. Return to freezer and allow to set overnight.

10. To unmold, simply invert over cake board or plate, place a warm towel over the pan for a couple of minutes. The cake should slide out without any problems. Grab ahold of the ends of the plastic wrap, and give it a tug if it is stubborn. Invert back so that vanilla ice cream is on top. Decorate with melted chocolate or whipped cream.

11. Drizzle with melted chocolate.

Recipe Source: http://www.foodnetwork.com/recipes/ice-box-cafe-peanut-butter-ice-cream-cake-recipe-2013443

Ice Cream Sundae

Last, but certainly not least, we recommend making one of the most timeless, ice cream-based desserts in the history of ice cream…a sundae!

Ingredients:

  • Ice cream (any flavor you love!)
  • Toppings of your choice

Here’s a list of our favorite toppings for inspiration:

  • Hot fudge
  • Sprinkles
  • Whipped cream
  • Strawberries
  • Raspberries
  • Pineapple
  • Bananas
  • Caramel sauce
  • Cookie crumbles
  • Cherries

Directions:

1. Scoop your favorite ice cream into a bowl.

2. Add your favorite topping.

3. Enjoy!

What’s your favorite ice cream-inspired dessert? Let us know in the comments below!

Ask the Doctor- Can I See an Image of An Expander Before Surgery? Is There a Metal in the Frame to Maintain the Shape”?

This week, Gail Lanter, CPC of The Center for Natural Breast Reconstruction answers your question.

Question: Can I see a picture of the expander before it goes into the body?

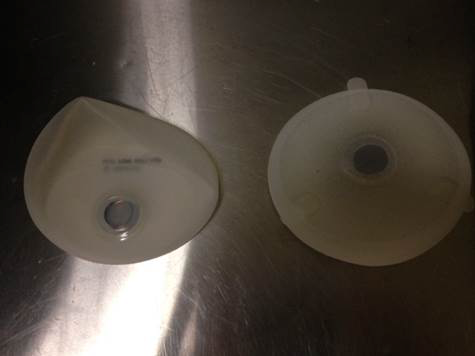
Answer:  Absolutely! Thanks for your question Mary Lou. Tissue expanders come from a myriad of manufacturers in a wide variety of sizes; each with different shell styles and features. This photo shows two that we have on hand now as samples.

The one on the right with the tabs is by Natrelle and the smaller on the left with no tabs is from Mentor.   The magnetic disc in the middle of each is the fill area.   Are there specific questions you would like answered about breast reconstruction with tissue expanders.  We’re happy to help!

Question: Thank you for the picture of the two different tissue expanders. The expander that is on the left, that comes to a point- is there metal in the frame of it to keep it’s shape? Thank you again for the information.

Answer: No ma’am, there is no support system. Just a shell. Expanders like these start empty and are made to be replaced with permanent implants. The expansion process and saline within is what gives the shape. The only metal is in the magnetic disc used to locate the port during that process.
Hope that helps!

Have a question about breast reconstruction or post-surgical you’d like answered from our surgical team? Just ask!

How to Help Keep Your Beaches Clean and Safe

Millions of people in the U.S. are lucky enough to live near a beach or a lake. And if you don’t personally live near a beach or lake, chances are you may take an occasional vacation to one during the summer months to go for a swim.

At The Center for Natural Breast Reconstruction, we are fortunate to live near some of the most beautiful beaches in the country—beaches that stay beautiful thanks to the hard work of the people who make an effort to keep them trash free and clean.

Protecting the water we live by is so important. We don’t know about you, but the last thing we want is to jump into the water and float around with a bunch of garbage. Gross!

Second, there are thousands of sea creatures (and lake creatures!) that depend on us to keep their habitats clean and safe. Sadly, every year animals die due to polluted waters.

There is good news though! It’s not hard to pitch in, do you part, and help keep the water safe for everyone to enjoy, whether you live near a beach or are just visiting.

This summer when you’re at the beach, we encourage you to lend a hand and help keep our beaches clean by doing the following things…

Pick Up Litter

It’s not uncommon to walk across a beach and find a food wrapper or a soda can. The next time you’re at the beach, bring a garbage bag with you. When you stumble upon a piece of litter, pick it up and throw it in your trash bag.

It may not seem like you’re making that big of an impact, but if everyone who visited a beach picked up just one piece of trash, it would make a world of difference to the animals that live in and near the water.

Use Reusable Containers

When you plan on spending an entire day on the water, it’s important to pack snacks and drinks to keep your energy up and keep your body hydrated. Unfortunately, many people pack their snacks and drinks in plastic bags and drink from disposable water bottles—items that can easily get left behind or blow away.

We know you’d never intentionally leave trash at the beach, but it’s really easy for lightweight plastics, water bottles, wrappers, etc., to get caught up in the wind and blow away without anyone noticing. To fix this problem, we encourage you to pack your snacks in reusable lunch boxes and fill up hard plastic, reusable water bottles to cut down on accidental litter.

Be Mindful of Using Water Toys/Floats

Rafts, water guns, and boogie boards all make playing in the water a lot of fun! And there’s nothing wrong with enjoying these water toys. It is a good idea, however, to be mindful and keep an eye on your beach toys—especially when you’re not playing with them.

It’s so easy for plastic squirt guns and floating toys to get swept away when a big wave crashes down on you. And during high tide, the sneaky water line creeps up and can wash away the toys and floats you thought were safely placed on the beach.

When you purchase rafts, boogie boards, surf boards, etc., look for the ones that have ankle or wrist straps so you don’t lose them if you get knocked over by a big wave.

Pick Up after Your Pets

If you’re a pet lover, you know how fun it can be for both you and your dog to spend a day at the beach together. What’s not fun is accidently stepping in a mess a dog left behind while you’re walking down the beach.

Out of respect for everyone on the beach, always be responsible for picking up after your pet.

Don’t Leave Cigarette Butts on the Beach

First and foremost, we strongly advise that you not smoke. Smoking leads to so many health problems such as asthma, respiratory diseases, and even cancer. It’s dangerous and harmful to your health.

For some tips on how to quit smoking, go here!

If you must smoke though, please be courteous and keep your cigarette butts off the beach. Not only is it disgusting for other beachgoers to have to walk over your cigarette butts, but it’s also dangerous for animals, like seagulls and sand crabs, that mistake the cigarette butts for food.

If your beach doesn’t provide a place for you to dispose of your cigarette butts, bring a plastic container to the beach with you to dispose of them.

Do you have any other tips about how to help keep our beaches clean? Please share them in the comments below!